DNS Provider Push
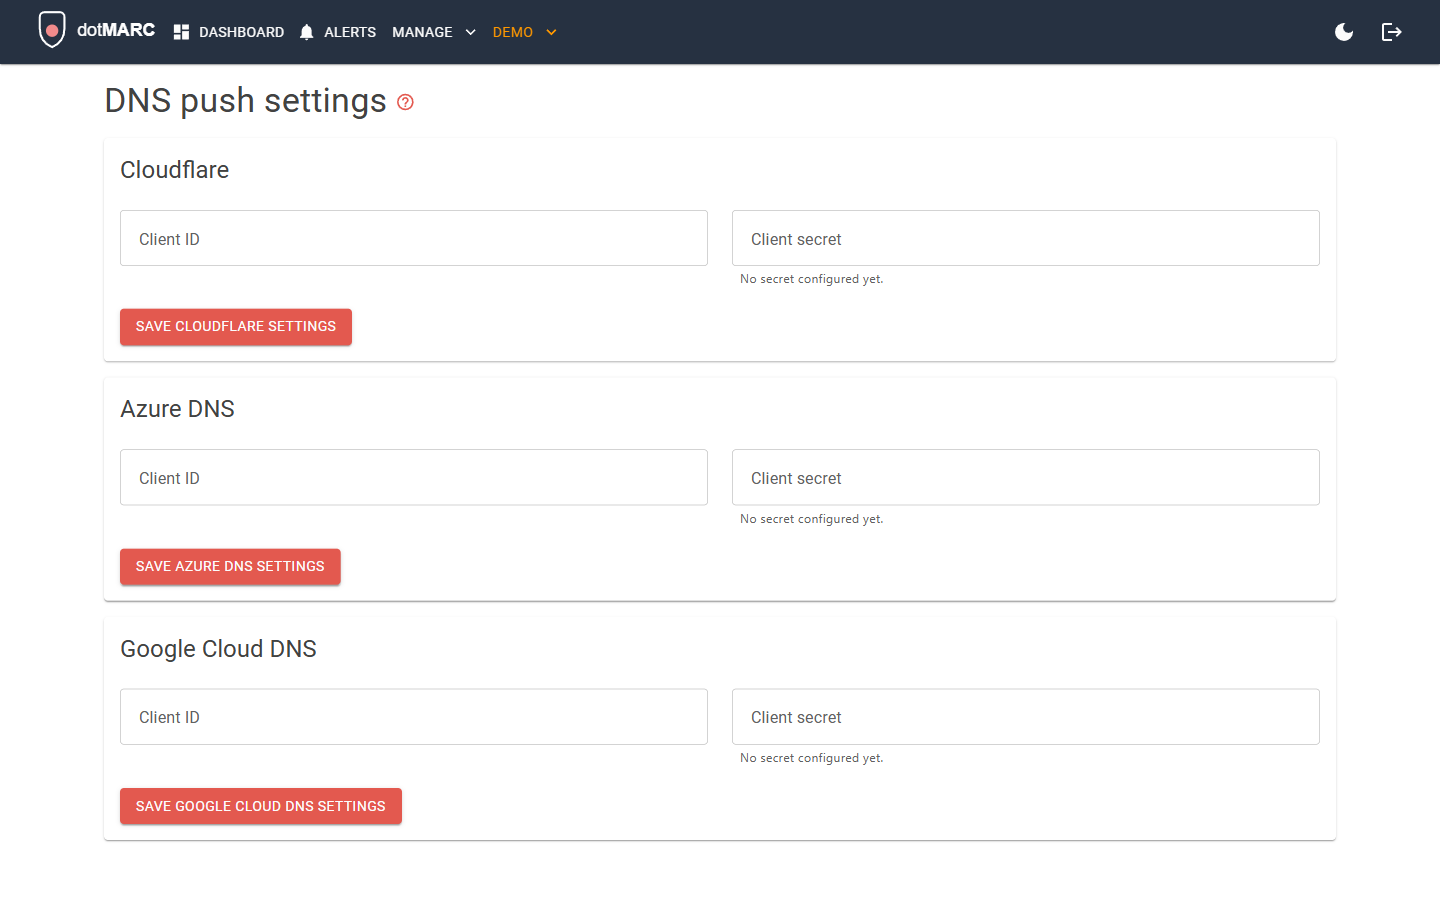
If a domain's DNS is hosted on Cloudflare, Azure DNS, or Google Cloud DNS, dotMARC can push its MTA-STS, DMARC, TLS reporting, SPF and DKIM records straight there instead of you copying them in by hand. Each push is authenticated fresh through that provider's own consent screen, with nothing about that authentication stored.
All three providers are independently optional and configured the same way regardless of how
you're running dotMARC (Docker or Azure): sign
in with an account holding the DnsPushManage permission and go to Manage → DNS push settings,
enter the OAuth client ID/secret for whichever provider(s) you registered below, and save. Leave
any of them unconfigured and dotMARC simply reports it can't find a configured push option when you
try to use it - the push action itself still appears, it just won't succeed for an unconfigured
provider.
Editing SPF
Edit SPF on a domain's SPF check opens the SPF editor. It starts from the live record. If the domain has more than one SPF record (an error, since receivers allow only one), it starts from them merged into one. With no record, it starts with an include for each mail service dotMARC detected.
In the editor you can:
- add an include, from a list of common mail services or by typing a host name;
- remove an include;
- set the ending:
~all(softfail) or-all(fail); - choose This domain sends no mail, which publishes
v=spf1 -all.
Every other part of the record is kept as it is.
The editor counts the DNS lookups the record needs, following each include. Receivers stop at 10 and SPF then fails, so a record over 10 can't be pushed. If the live record is already over 10, any edit that lowers the count can be, so you can work your way back under.
The domain's apex usually holds other TXT records too, such as site verifications. The push changes only the SPF record and leaves the others alone. If someone changes SPF in the DNS provider after you open the editor, the push stops and asks you to reopen it.
The ending for new records is set under Manage → DNS push settings → DNS records (~all by default).
DKIM records
Configure selectors on a domain's DKIM check takes, for each selector, the record your mail platform gives you: a CNAME target or a TXT value with the key. Where to find them:
| Mail platform | Where |
|---|---|
| Microsoft 365 | The Defender portal's DKIM page, or Get-DkimSigningConfig (Selector1CNAME and Selector2CNAME). Paste either into Paste from Microsoft 365 to fill both selectors at once. |
| Google Workspace | Admin console > Apps > Google Workspace > Gmail > Authenticate email. |
| Zoho Mail | Admin console > Domains > Email configuration > DKIM. |
| Proton Mail | Settings > Domain names, the domain's DKIM step. |
| Fastmail | Filled in for you. |
Selectors that already have a record in DNS are filled in from it, whatever the mail platform. For a Microsoft 365
domain with nothing published yet, each selector starts with the part of its target that follows from the domain
(for contoso.example, selector1-contoso-example._domainkey.). The rest, your tenant's onmicrosoft.com name and a letter Microsoft assigns,
can only come from Microsoft 365, and dotMARC won't save a target that stops at ._domainkey.
Paste records as the console shows them: quotes and line breaks are tidied away. Once a selector has a record, the DKIM check also checks DNS matches it, and says so if a CNAME is in place but the mail platform hasn't published the key yet (turn on DKIM signing there). Push DKIM records then creates or updates the records that don't match, showing anything it would overwrite first.
Cloudflare
Register a self-managed OAuth client at Manage account → OAuth clients → Create OAuth client in the Cloudflare dashboard. dotMARC's push flow is a confidential, server-side exchange with PKCE as defense in depth, not a public/PKCE-only client, so two of the form's defaults need changing:
| Field | Value |
|---|---|
| Client Name | Anything recognizable, e.g. dotMARC |
| Response Type | Code (the form may default to Token - that's the implicit flow, not what dotMARC uses) |
| Grant type | Authorization Code |
| Token Authentication Method | client_secret_post (the form may default to None (PKCE), for public clients with no secret - dotMARC's callback sends the client secret as a token-exchange body parameter, so it needs a secret-bearing method) |
| Redirect (Callback) URLs | https://<your-deployment-host>/dns-push/cloudflare/callback |
| Client URL | Leave blank - only required to make a client public; dotMARC's stays private |
Typing the URL isn't enough - you have to press Enter to actually add it to the list before Cloudflare will let you continue. It's easy to sit there wondering why Next won't respond because nothing visually prompts you to do this.
On the next step (labeled DNS & Zones in Cloudflare's permission picker), tick Edit for both DNS and Zone. The Zone one is easy to skip since it isn't DNS-specific, but dotMARC needs it to resolve a domain name to its Cloudflare zone ID before it can push anything - DNS access alone can edit records inside a zone once it knows the ID, but can't look that ID up.
After you click Continue on that step, a second step appears listing the permissions you just picked with a Required toggle next to each - this doesn't show up until you continue past the first step, so don't go looking for it there. Leave both marked Required (not optional). Finish creating the client, then note its Client ID and Client secret - you'll enter both into dotMARC directly (see above), there's nothing to set as an environment variable or deployment parameter for this.
Azure DNS
Register a third, separate Entra app registration (do not reuse the mailbox or dashboard app from
Getting Started). Go to App registrations → New registration, set
Supported account types to the multitenant option (accounts in any organizational directory) -
this flow lets each customer authorize a push into their own tenant, which is a different tenant
than the one this app registration lives in, so it must not be restricted to a single tenant. Then
Authentication → add a Web redirect URI of
https://<your-deployment-host>/dns-push/azure-dns/callback, then API permissions → add the
delegated Azure Service Management → user_impersonation permission.
create-azure-dns-app.sh does all of the above and prints the client ID and secret to enter in dotMARC. Run it in
Azure Cloud Shell (Bash), or anywhere with bash and a signed-in Azure CLI, giving it your dotMARC host:
curl -fsSLO https://raw.githubusercontent.com/homotechsual/dotMARC/main/scripts/dns-push/create-azure-dns-app.sh
bash create-azure-dns-app.sh dotmarc.contoso.example
Running it again reuses the app rather than creating another, adding the redirect URI if it's missing and issuing a
new secret alongside the old one. --name changes the app's name, and --secret-years how long the secret lasts
(2 years by default).
The script
loading...
Google Cloud DNS
In a Google Cloud project, enable the Cloud DNS API and Cloud Resource Manager API, then
create an OAuth client at APIs & Services → Credentials → Create Credentials → OAuth
client ID (application type Web application), with an authorized redirect URI of
https://<your-deployment-host>/dns-push/google-cloud-dns/callback. On the OAuth consent
screen, add both scopes dotMARC requests: .../auth/ndev.clouddns.readwrite (read/write access
to Cloud DNS) and .../auth/cloudplatformprojects.readonly (lets dotMARC list the customer's
projects to find which one holds the target zone - it never needs a project ID entered manually).
The Cloud DNS write scope is a Google-classified "sensitive" scope, so while your own account can authorize while the app is in Testing mode (add it to the consent screen's test users list), any other customer will need the consent screen submitted for Google's verification first - a one-time review in Google Cloud Console that can take several days to turn around. Budget for that lead time before relying on this provider for a customer outside your own test-user allowlist.
prepare-google-cloud-dns.sh enables both APIs in your project, then prints the redirect URI, the two scopes and a
direct console link for each remaining step. gcloud can't create this kind of OAuth client, so the consent screen and
client are still made in the console. Run it in Google Cloud Shell, or anywhere with bash and a signed-in gcloud CLI:
curl -fsSLO https://raw.githubusercontent.com/homotechsual/dotMARC/main/scripts/dns-push/prepare-google-cloud-dns.sh
bash prepare-google-cloud-dns.sh dotmarc.contoso.example your-project-id
The script
loading...